Create An Online Text Editor With The Dojo Toolkit
The Dojo Toolkit is much more than an Ajax library for handling asynchronous requests. It also contains an extensive number of DHTML libraries and components of which you can make use right out of the box. In this lesson, I'll present an online editor using two Dojo widgets - or Dijits - the Rich Text Editor and the Tree.
I've always had a thing for creating editors. When I began teaching XML, I searched for a suitable editor that didn't hide all of the code but included enough tools to actually get something done. After a fruitless search, I ended up writing my own editor. You can download JXEd if you'd like to try it out. It is based on the Netbeans Platform - so the user interface will be very familiar if you've been following along!
JXEd is, in my humble opinion, a nice tool if you want to get your hands dirty with the code. In my experience, though, there are far more people out there who want no part of writing code. These people, however, still need to create pages for the web. The online editor I'll present here is a starting point to serving those folks.
If you didn't create the last project, you'll need to follow the steps in the Dojo Ajax Demo to get all of the external files you'll need for this project. At the very least, you'll need to create a Web Application and copy the Dojo files to the script folder to get my code working. If you aren't interested in the code at all, you can download the entire project here: DojoToolkit.zip. Unpack the zip file and install dist/DojoToolkit.war in the servlet container of your choice.
1. Right-click the Web Pages node and choose New > HTML... Name the file editor and click Finish.
2. Add <link> elements to the <head> that point to the necessary Dojo stylesheets:
<link type="text/css" rel="stylesheet" href="script/dojo/dijit/themes/tundra/tundra.css" />
<link type="text/css" rel="stylesheet" href="script/dojo/dojo/resources/dojo.css" />
3. Add a reference to the Dojo script in the <head>:
<script type="text/javascript" src="script/dojo/dojo/dojo.js"
        djConfig="parseOnLoad: true"></script>
4. Add a <style> element to the <head> that contains rules for the widget elements:
    <style type="text/css">
        #myEditor{
            position: absolute;
            left: 200;
            border: 1px black solid;
            width: 700px;
        }
        #fileTree{
            position: absolute;
            left: 5;
            width: 190px;
        }
    </style>
5. Add a <script> to the <head> with the following code:
        <script type="text/javascript">
            dojo.require("dojo.parser");
            dojo.require("dijit.Editor");
            dojo.require("dijit._editor.plugins.TextColor");
            dojo.require("dijit._editor.plugins.LinkDialog");
            dojo.require("dijit._editor.plugins.AlwaysShowToolbar");
            dojo.require("dijit._editor.plugins.FontChoice");
            dojo.require("dojo.data.ItemFileReadStore");
            dojo.require("dijit.Tree");
            dojo.require("dijit.ColorPalette");
            dojo.require("dijit.Menu");
        </script>
The above code just declares which Dojo libraries are needed to create the application. You can see that the editor uses a plugin mechanism to load features. The editor I built uses all available features. You'll see in a moment how to enable/disable features. The ItemFileReadStore object is interesting in that it serves as a model for the tree. That is, it represents the data visible in the tree.
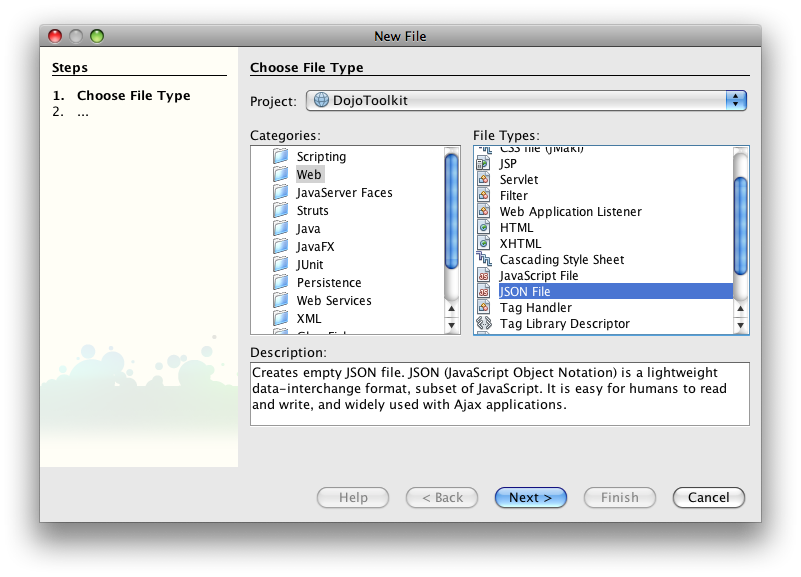
6. Right-click the Web Pages node and choose New > Other. From the Web node, choose JSON file. Name it fileSystem and click Finish.
7. Add the following code to fileSystem.json:
{
	identifier: 'id',
	label: 'name',
	items: [
		{ id: '0', name:'subFolder', path:'test/subFolder', folder:'true',children:[
			{ id: '1',name:'test2.html', path:'test/subFolder/test2.html'}
		]},
		{ id: '2', name:'test1.html', path:'test/test1.html'},
		{ id: '3', name:'test3.html', path:'test/test3.html'}
	]
}
The JSON code above is intended to represent files in a file system that looks something like this:
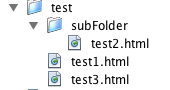
8. Create a folder within the Web Pages node named test. Add 2 new HTML files to the folder tamed test1.html and test3.html. Add a folder to the test folder named subFolder. Add an HTML file to the subFolder named test2.html. I put some text in each file so that I could recognize which file was currently active in the editor. When you've finished, your Web Pages node should look something like the above image.
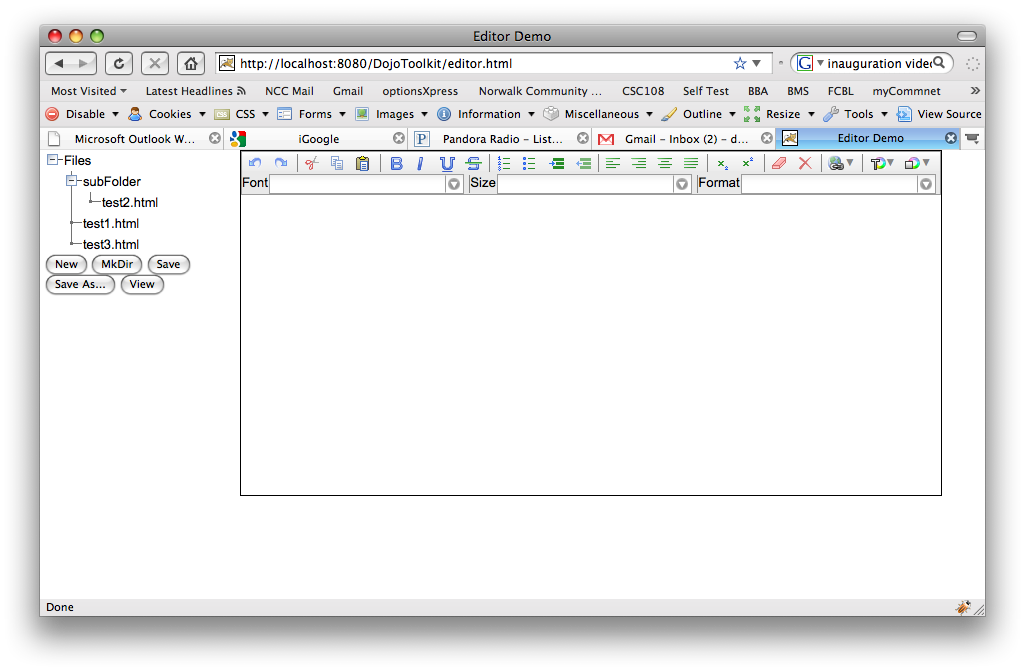
9. Add the editor and its container to the <body> element of editor.html:
    <div id="myEditor">
        <form method="post">
        <textarea id="theEditor" width="700px" dojoType="dijit.Editor" extraplugins="['|','subscript','superscript','|','removeFormat','delete','|','createLink','|','foreColor','hiliteColor','fontName','|','fontSize','|','formatBlock']">

        </textarea>

        </form>
    </div>
The above code will load a Dojo Editor with all of the default plugins as well as those specified in the extraplugins attribute. The '|' character is just a separator. You can use the plugins attribute to limit the available plugins to just those specified. The available plugins are:
Note that some of the plugins require separate libraries as specified in the <script>. Also note that I could not get inserthtml to work in any browser. I suspect it is not implemented yet. I got the above list from the Book of Dojo - Rich Text Editor Documentation.
10. Add the ItemFileStoreRead widget to the <body>:
<div dojoType="dojo.data.ItemFileReadStore" jsId="filesystem"
		url="fileSystem.json"></div>
The jsId attribute is the only thing of note - it specifies to the browser how to refer to the store in code. So, in my script, I can refer to the store as filesystem and make use of the built in Dojo methods and properties.
11. Add the Tree to the <body> element:
    <div id="fileTree">
       <div dojoType="dijit.Tree" id="mytree" store="filesystem"
		labelAttr="name" label="Files">
		<script type="dojo/method" event="onClick" args="item">
                    if(item){
                        if(filesystem.getValue(item,'folder'))
                            return;
                        else
                            getFile(filesystem.getValue(item, 'path'));
                    }
		</script>

	    </div>
        <input type="button" value="New" onClick="newFile()"/>
        <input type="button" value="MkDir" onClick="newDir()"/>
        <input type="button" value="Save" onClick="saveFile()"/>
        <input type="button" value="Save As..." onClick="saveFileAs()"/>
        <input type="button" value="View" onClick="viewFile()"/>
    </div>
Note that the <div> contains a dojoType attribute that is read by the Dojo libraries to determine the type of widget to draw. You can also see the <script> element inside the tree <div>. The script type is set to dojo/method and the script event is set to onClick. By including this script inside the tree div, you have created an onClick event handler for the tree. The item property returns which object in the tree was clicked on. Essentially, the handler specifies that the getFile() function should be called with the item's path attribute for anything that is not a folder. The path attribute is determined in the filesystem.json file. Finally, I've added some buttons underneath the tree to handle basic Input/Output functionality. We will write the functions specified next.
12. Create the getFile() function. Add the following to the <script> element in the <head>:
       var userDir = 'test/';//In the "real world" this would be password-protected user dir
       var fileName = '';
       function getFile(theFile){
            dojo.xhrGet( {
            url: theFile + '?randomizer=' + parseInt(Math.random()*50505050), //trick browser cache
            handleAs: "text",
            timeout: 5000,
            load: function(response, ioArgs) {
              dijit.byId('theEditor').setValue(response);
              return response;
            },
            error: function(response, ioArgs) {
              alert("HTTP status code: ", ioArgs.xhr.status);
              return response;
              }
            });
            fileName = theFile;
       }
This code is virtually unchanged from the Dojo Ajax Demo. The only thing of note is the url property. I ran into some problems with browsers caching pages - even after I had saved them and reloaded. So I came across this concept when looking for a way to force the browser to load the file from the server. All the code does is append a useless request variable to the url. That forces the browser to fetch the file again.
13. Add the I/O functions to the <script> element in the <head>:
        function saveFile(){
           if(fileName=='')
               saveFileAs();
           else{
               if(fileName.indexOf(userDir)<0)
                   fileName = userDir + '/' + fileName;
               dojo.xhrPost({
                   url: 'saveFile.jsp',
                   content: {
                       filename: fileName,
                       fileContent: dijit.byId('theEditor').getValue(),
                   },
                   load: function(response, ioArgs){
                       return response;
                   },
                   error: function(response, ioArgs) {
                       alert("HTTP status code: ", ioArgs.xhr.status);
                       return response;
                   }
               });
           }

       }
       function newFile(){
           fileName = '';
           dijit.byId('theEditor').setValue('');
       }
       function saveFileAs(){
           fileName = prompt('Enter File Name');
           saveFile();
       }
       function newDir(){
           var temp = fileName;
           fileName = prompt('Enter new directory name');
           saveFile();
           fileName = temp; //Don't lose reference to current file
       }
       function viewFile(){
           if(fileName==''){
               alert('You must first save the file');
               saveFileAs();
           }
           else
               open(fileName);
       }
The saveFile() function uses xhrPost instead of xhrGet to do the asynchronous call. Some servers limit the amount of data permitted in get request variables so using post makes sense. Note that the way to include the data is to create a content property and assign request variables and data inside it. The rest is nearly identical to xhrGet with the exception of not really processing the response.
14.Right-click the Web Pages node and choose New > JSP... Name the file saveFile and click Finish. Replace any generated code with the following:
<%@page contentType="text/html"%>
<%@page pageEncoding="UTF-8"%>
<%@page import="java.io.*" %>
<%
    String fileDesc = request.getParameter("filename");
    if(fileDesc.indexOf(".")<0){
        //make directory
        new File(application.getRealPath("/" + fileDesc)).mkdirs();
    }else{
        File theFile = new File(application.getRealPath("/" + fileDesc));
        String str = "";
        BufferedReader reader = new BufferedReader(new StringReader(request.getParameter("fileContent")));
        BufferedWriter writer = new BufferedWriter(new FileWriter(theFile));
        while((str=reader.readLine())!=null){
            writer.write(str + System.getProperty("line.separator"));
        }
        writer.flush();
        writer.close();
        reader.close();
    }
%>
The code above just grabs the parameter and either creates a directory if no "." is part of the parameter or creates the file on the server. Note that the file is overwritten even if it already exists with no warning. Also note that the user must first build a directory before saving the file if the file is to be stored in a directory that doesn't yet exist (I told you this was a starting poing!).
The application is actually ready to run right now. But ask yourself if it makes sense to hard code the files in the file system. Wouldn't it make more sense if the user's file system were read dynamically? Also, once we gave the user the ability to create new files, we need to implement a mechanism to update the tree. Right now, the only way to do that is to update the ItemFileReadStore. That's certainly do-able, but it makes more sense to read the file system from the server and refresh the tree as necessary. All we'll need to do is create a JSON-formatted string to pass to the store.
15. Right-click the Web Pages node and choose New > JSP. Name the file fileSystem and click Finish. Replace any generated code with the following:
<%@page contentType="text/plain"%>
<%@page pageEncoding="UTF-8"%>
<%@page import="java.io.*"%>
<%
String curDir = request.getParameter("dir");
File theDir = new File(application.getRealPath("/" + curDir));
File[] theFiles = theDir.listFiles();
StringBuffer buffer = new StringBuffer(256);
out.print(getFileSystem(theFiles,curDir,buffer));
%>
<%!
String getFileSystem(File[] files, String dir, StringBuffer buffer) throws Exception{
    if(buffer.length()==0)
        buffer.append("{\nidentifier: 'id',\nlabel: 'name',\nitems: [\n");
    for(int i=0; i<files.length;i++){
        String webPath = files[i].getAbsolutePath();
        webPath = webPath.substring(webPath.indexOf(dir + "/"));
        int id = (int)(Math.random()*5050505);//if 2 ids match, tree gets blown up!
        if(files[i].isFile()){
            buffer.append("{ id: '" + id + "', name:'" + files[i].getName() +"', path:'" + webPath + "'}");
            if(i<files.length - 1)
                buffer.append(",\n");

        }else{
            buffer.append("{ id: '" + id + "', name:'" + files[i].getName() +"', path:'" + webPath + "', folder: 'true', children:[\n");

            getFileSystem(files[i].listFiles(),dir, buffer);
            //buffer.append("\n]}");
            if(i<files.length - 1)
                buffer.append(",\n");
        }

    }
    buffer.append("\n]\n}");
    return buffer.toString();
}
%>
The code above simply loops recursively through a directory structure and populates a StringBuffer. When finished, the buffer's content is written to the response. The goal is to mirror the data structure in fileSystem.json.
16. Change the reference to the ItemFileReadStore:
<div dojoType="dojo.data.ItemFileReadStore" jsId="filesystem"
		url="fileSystem.jsp?dir=test"></div>
17. Add the refreshTree() function to the <script> and call it from the saveFile() routine:
        function saveFile(){
           if(fileName=='')
               saveFileAs();
           else{
               if(fileName.indexOf(userDir)<0)
                   fileName = userDir + '/' + fileName;
               dojo.xhrPost({
                   url: 'saveFile.jsp',
                   content: {
                       filename: fileName,
                       fileContent: dijit.byId('theEditor').getValue(),
                   },
                   load: function(response, ioArgs){
                       return response;
                   },
                   error: function(response, ioArgs) {
                       alert("HTTP status code: ", ioArgs.xhr.status);
                       return response;
                   }
               });
           }
           refreshTree();
       }
       function refreshTree(){
           dijit.byId('mytree').store._loadFinished = false;
           dijit.byId('mytree').store.fetch();
           dijit.byId('mytree').state = "UNCHECKED";
           dijit.byId('mytree')._expandNode(dijit.byId('mytree'));
       }
I found code somewhat like what I needed to refresh the tree in the Dojo forums.
You're now ready to run the application. You should be able to load, save, and create files as well as create directories. The Dojo Toolkit makes it relatively easy to add high level functionality to your web applications.